Thursday, June 30, 2005

Blast from the Past

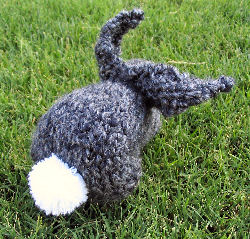
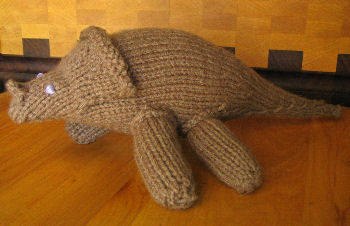
From the Prehistoric Past that is :D And while the real Triceratops do indeed have three horns, I took some creative liberties and decided that one horn was enough for this guy.

Pattern: from Xtreme Jen's Blog - Jen has also designed other things and has been published in Magknits. Go check out her blog for her other designs.

Yarn: Definitely Acrylic - for easy care - from Carron. Unfortunately I no longer have the label - it was reclaimed from this bag.

Comments: The pattern is simple and straightforward - but if you're making copies to tote around with you, be sure to bring the whole pattern - as the body & tail and legs of this guy are the same as for the Brontosaurus. I nearly ran out of knitting because I had not noted that fact when I put my project in my bag for carrying around! As noted above, I did not add the top two horns - and the nose horn also does not follow the pattern - it was my first adventure into crochet and it seems to have come out alright. Also feeding my Crochet Learning Curve was the attachment of the legs - done in slip stitch after being stuffed. I got the spacing a bit off - since I wasn't referencing the photo - my dino's legs are a bit close together (front to back), but I kinda like how they turned out. I should also note that I forewent the added mouth - as I didn't think it went well with the dino. I think my least favorite part were the legs - they are knit flat and then seamed up - because I dislike seaming, I probably should have just knit the foot, then picked up the stitches for the leg. Ah well. Live and learn, right?

Tuesday, June 21, 2005

Can you pull a Rabbit out of a Swatch?

I can :) and isn't he adorable? And he even sits like a real bunny! Unfortunately the little cotton tail I spotted in the grass across from my house wasn't cooperating - otherwise I would have proof to post in the way of a photo!

Pattern: From HeartStrings Fiber Arts

Yarn: Lion Brand Homespun in Edwardian with SWTC Karaoke for the Eyes and Lion Brand Microspun for the tail.

PomPom Maker: Hand cut thin cardboard die - perhaps an inch and a half in diameter in width, with the center hole half the diameter - be sure to totally fill the hole while wrapping yarn so a nice fluffy pom-pom is had :)

Comments: The cute little guy kinda reminds me of Stitch (from Lilo and Stitch) due mostly do his crazy long ears - In case you are wondering, I knit the "alternate" ears noted at the bottom of the pattern. Anyway, back to comments on the pattern! Very easy to follow, and an excellent use of random gauge swatches (if you don't happen to reclaim your gauge swatches that is). The Bunny is made of a stockinette square, and a pair of ears...all the fancy bunny form is in the seaming. Because of the bulkiness of the homespun (knit tight on US9 needles) my seams weren't as tidy as I would like - and might have benefited from being seamed with a thinner yarn (I seamed with homespun as well - just in case the yarn showed). This little guy came together in no time at all - perhaps an hour or two while watching TV - I probably spent the same amount of time seaming as I did knitting the stockinette square - but then I'm not a real fast knitter or seamer...

Thursday, June 02, 2005

Felted Rose Karaoke Bag

Behold! The bag as it blocks!


Following the felted flower bag craze, this bag is a fun creation knit out of Karaoke, a new yarn releasing to the public this July from Southwest Trading Company.

I had the distinct pleasure of being able to play with multiple colors of Karaoke - a different one for each of the twelve flowers that adorn the bag. I must say, they did come out quite lovely - after I did some minor repairs after the first wash.

Pattern: Designed by Sue Morgan - Sue has quite a number of designs floating around - a quick google turned up a bunch of cute patterns available on Get Knitted - look in the Bags & accessories - Kits and Patterns section! She even has a bag that features knitted daisies!

Yarn: SWTC Karaoke, multiple shades.

Comments: Worked in the round, this bag was quick and easy to knit. I cranked this baby out in about a week. If you dislike seaming like I do, I knit the tabs right onto the bag body as I bound off - a much better option for me than knitting them separately and attaching them later - especially since there are fourteen of them! While it has been through my washer twice, it could probably felt down more if I was determined - I have a front loader, so it typically takes a few extra runs through.

Apparently my CRC is still good for something :)

As you can see, the bag was fairly large to begin with - prefelt measurements were approximately as follows:

Straps: 25 inches (63.5 cm), 145 rows of i-cord! I knit them a little longer than called for and still think they might do better a mite longer - only time will tell as the bag sees some use.

Bag Base: 11 x 5 1/4 inches (28 x 13.3 cm)

Bag Height: 13 inches (33 cm)

After going through two washes in my machine with some other things thrown in to add friction, the bag had shrunk - mostly to compress the rows. I noticed no change in the Bag width, but the base had shrunk to 4 1/2 inches (11.4 cm) deep and 10 inches (25.4 cm) in height. Why the metric conversions? Its just in case the designer visits and is curious on measurements - she's from the UK! As I mention, it could probably felt down more, but I'm a smidge time constrained as this is a test knit that needs to get back.

The only problem I encountered was when I took the bag out of the machine after the first wash - seems simply affixing the flowers via the loose tail that was pulled thru the remaining stitches at the end (to make them curl on themselves) wasn't quite enough - some of the flowers were looking rather droopy and not happy - I quickly reinforced them, threading yarn through the various layers of the flower in order to more securely attach them. They would be even more adorable with little leaves, a la the Vogue Rose Basket Bag. Clustering the flowers more closely together in a couple spots, rather than evenly distributing them along the top edge might also make a nice variation. And to make it more purse sized, I'd probably not knit it not quite so deep - the bonus of that is less yarn required and faster finishing time!