Tuesday, February 28, 2006

Leaf Lace Redux

Remember my Leaf Lace Pullover for the Knitting Olympics?

You may recall I had some concerns over how the sweater would buckle not far down from the neckline...well, I took the sweater out for a debut, and the buckling (which became more pronounced) simply drove me bonkers.

So I spent several hours over the weekend attempting to figure out how to de-and reconstruct the sweater. It seemed there wasn't enough allowance for the shoulder area, resulting in the buckling - and since I'm so dreadful at Kitchner Stitch (you'd think I'd be an expert after grafting the sweater together!) I decided I'd remove the kitchner, and knit up from the bottom. Unfortunately, this meant a serious overhaul was in order. My limited understanding of set in sleeves (and my desire to not have to rip out and reshape the sleeve caps) in addition to my even more limited understanding of neckline shaping made for a frustrating evening of pattern modification.

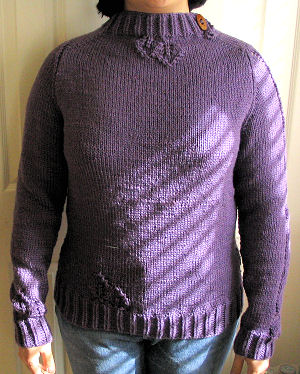
Behold! The fruits of my labors! Excuse the color - the photos in the original leaf lace pullover post are more true. I was so pleased when I was finished I simply couldn't wait until I had proper lighting conditions!

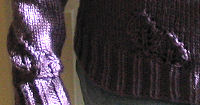
The set in sleeves went in fairly well, though it seems perhaps I have a little bit more space than I anticipated in the bust area - the photo is a little unflattering, as it seems a little lumpy - I assure you, I'm not lumpy and neither is the sweater. I don't know what was going on...and I didn't want to wait to post until I had better photos taken. You'll notice some holes over on the right shoulder (on the left side of the photo) and in the center of the v-neck...

The holes on the shoulder were intentional...and if you look more closely, they will resolve themselves into the leaf lace pattern. The holes in the center of the v-neck were not intentional...but they seem to mirror the eyelet lace on the sleeve. The holes are an artifact of twisted stitches in the center of paired decreases. I had initially done the neckline with a regular knit stitch in the center, but later decided I didn't like how that looked and decided to redo it with a twisted stitch, resulting in those unanticipated openings.

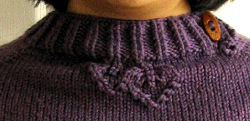
A closeup of the neckline shows the little leaves and the center stitches of the v-neck in more detail. In case you're trying to puzzle out how I got those leaves there while knitting from the bottom of the sweater up: The answer is those are actually knit from the top down and kitchnered to the body. If you look closely, you can see a slight line where the kitchnering took place. You might also notice that my nice line of marching "V"s along side of the V-neck are slightly interrupted. This is due to the fact that knitted increases do not make the same detailing as knitted decreases (at least not the kind of increases I was using (M1 inc)). To get the marching V's back, I played around with a crochet slip stitch applied to the border. While not perfect, it's good enough for me, and can be redone if at some point I decide it needs to be better matched to the opposite side of the neckline.

Sunday, February 19, 2006

Leaf Lace Pullover

Cast on for the Yarn Harlot's Knitting Olympics, I'm pleased to say I've finished this sweater within the allotted time, with a week to spare!

Pattern: modified from the Leaf Lace Pullover in Teva Durham's Loop-d-Loop. The pattern was altered to work with a worsted weight yarn, lengthen the body and add a touch of shaping at the waist.

Yarn: Southwest Trading Company Optimum in Lilac

Needles: US8

Comments: If you have trouble with Kitchner stitch, this is not the sweater for you - both arms are grafted to the body at the shoulder, and the top and bottom of the sweater are also kitchnered together. Overall, I'm fairly pleased with the sweater, and I do like the leaf details.

The lengthening of the body obviously does result in the hem and arm leaves landing fairly close together - I suppose I could have not lengthened it quite so much, but I really dislike sweaters that land right below my waist, as it typically means I have to remember to keep my arms down or risk baring my non-sculpted middle!

While I'm not minding the placement of the leaves at the neck - through some inconsiderate math on my part, they landed nearly right in the center, rather than being offset - I am still undecided on the neckline with its mock-turtle-like lines. Over the course of time, it has a tendency to buckle a bit. I have been successful in resolving this problem by wearing the sweater with the neck unbuttoned and folded over - though that solution hides the leaf details and is asymmetric.

While the sweater is indeed finished and perfectly wearable, I'm not certain how long it will remain in this state. I may very well decide in some time to pick out the kitchner stitching, detach the arms, and re-knit the top of the sweater with a crew or scoop neck - sans leaves of course....but it's safe for now :D

Friday, February 17, 2006

Spindles for Plying


Behold! A small fleet of spindles that have been created expressly for plying! After completely filling up my Emily Spindle full to bursting (the thing looked ridiculous), I decided I needed a spindle with a bigger whorl.

Instead of going out to purchase more spindles, I decided I'd go head and make my own...more economical, and a bigger whorl too! In this case, size *does* matter (at least for plying anyhow!)

Following the instructions from Interweave and DIY Network, I was able to gather the materials to make several spindles.

As you can see, I put three spindles together, they range in weights from 1.6 oz to 2.7 oz. The heaviest, pictured to the left, actually is made of 4 CDs - 2 pairs of 2 spaced closely together. The medium weight one has a bunch of binder clips attached to the edge to add weight, and the last one is simply a pair of CDs on the dowel. I haven't had a chance to ply with them yet, as I've been engrossed in my knitting olympics project.

Monday, February 13, 2006

Last minute Spinning

With a touch of OC tendencies and a type A personality, I couldn't leave the yarn alone. After filling the bobbin, I couldn't resist taking the spinning to completion and plying it up.

I present "Nighttime Sky" - handblended merino fibers in various shades found in the sky - over a base of midnight blue, there are shades from a bright blue, to a steel blue of an overcast day. To add some fun, there are slight hints of lavender as found during the twilight hours, and a sprinkling of firestar. The handblended merino was corespun over the top of a blue snarl spun commercial yarn and the resulting single was plied with shiny metallic to mimic the twinkling lights of the night time sky.

A closeup detailing the texture can be found at the shop - go check it out :)

Friday, February 10, 2006

Dry At Last!

Skeined up and ready to go to a new home, should anyone care to buy it....

I present Beaded Bumbleberry Pie! Like the rest of the Bumbleberry Pie family, the colors are rich berry colors, and was made from space dyed targhee wool. I was tiring of doing up coils, so I tried my hand at beading singles as I was spinning. It's a bit frustrating, and very labor intensive - and I'm not convinced it's the best thing for my wheel (I'm noticing wear on my flyer hooks!) The sequins on the singles had a tendency to catch on the hooks, though they passed nicely while plying.

If you care to make this yarn your own, it is available from my shop.

Tuesday, February 07, 2006

More Coils!

Spun up a few more coils over the weekend - the closeups are available at the shop.

In an attempt to get more exposure, I've started posting some items to etsy, and I've changed the shipping to $5- flat shipping rate. We'll see how it works out! I'll probably be taking a break from coils for a while, and work on some other techniques.

Monday, February 06, 2006

Reduce Reuse Recycle


I don't know how it happens, but somehow it seems all those silly plastic grocery bags pile up and start a-multiplyin'! Usually, they eventually get rounded up and recycled by bringing them to a local drop off point. This time, however, I decided to recycle them myself by turning them into a gym tote! I'd had it with my regular gym bag - it wasn't quite roomy enough, things were constantly falling out (because I'd have them piled precariously on top), and it didn't breathe at all! While a plastic mesh tote is not the most fashionable of objects, it certainly seems to do the job well, and I really don't have to worry about it getting wet or dirty.

Not terribly difficult, just a little labor intensive getting the prep work done, this tote was finished in about a week from start to finish, replenishing my plastic bag yarn as I went along.

To prep, I cut the bags into about 1-inch wide strips, then girth hitched them all together to make a continuous piece. For the mottled look, I threw in some white bag strips in with the yellow every now and again.

Using a the largest crochet hook I had in the house (a size P I think), I created a rectangle that was an appropriate size for the bottom...I then started working in the round to make the sides and handles of the bag. The little divider was added after the fact, by picking up stitches in the bottom of the bag, then working side to side, picking up stitches on the sides to anchor it in place.

It's a little roomy, and it does stretch some, but over all, I'm pleased with the result :)

Wednesday, February 01, 2006

New Yarns!

Picture heavy post! But it is all yarn, so drool away :)


First up is my next skein of supercoiled bumbleberry pie. The first skein went to live with the Luscious Gracious Clan and was turned into a stunning wrap (scroll down past the cool guitar strap to see the photos!). I figured I'd turn the rest of that roving into similar yarn.


Next we have a combination of handblended fiber (why yes, the box o fiber has been moved in, sorted by hue, and the carder has been used :D) It's a bunch of greens that remind me of the surprising variety of green plants here in the desert, and it's been plied with a commercial orange, red and gold flecked novelty yarn. The colors reminded me of a southwestern coral bean plant. I think I'll be gathering a lot of my inspiration for future blendings from my outdoor adventures!


And finally you can ogle what's left of my green yarn - there was just a smidge left over (about 8.5 yards worth), and it's got lovely heathery greens and a little sparkle and shine from the firestar that I blended in.

The two upper yarns are now posted for sale at my shop! A closeup of the southwestern Coral Bean yarn can be ogled there, along with a photo of the plant that inspired it.