Pattern: Audrey in Unst
 from the fall 2009
Twist Collective by
Gudrun JohnstonYarn: SuDan Hug-a-sheep handspun 2-ply Border Leicester (from a sheep named Libby on SuDan farm in Oregon)
Needles: Ravelry fails me - or rather I failed and didn't enter the data. I can't remember if I used US4 or US5 or US6. Regardless, there was math involved.
 Comments:
 In short? I love it. This was a fast and fairly simple knit - and it was especially interesting because it's seamless. I love learning new techniques, don't you?
Because I seem to get stalled during the finishing, I always look for patterns that have minimal finishing required - in this case, this sweater has faux seams (along with some shaping) on the sides, and seamless set in sleeves (shaped by picking up stitches and short rowing). In addition to the faux seams and set in sleeves, Audrey has nice details including the twist stitch ribbing, the shetland lace bib motif and the I-cord edging at the neckline.

As I mentioned above, there was definitely math involved - I swatched hoping to get in the same ballpark range as the gauge specified in the pattern, but the yarn is definitely thicker in grist than the yarn called for in the pattern. As you may imagine, the major math bits were around the armscye, the lace motif and the neckline - I wound up reducing the number of lace motifs in the bib motif, while still having it occupy approximately the same space as on the original design. The neckline is a bit more boat-shaped, making it challenging to find clothes to wear under it if I want to layer (I tend to live in T-shirts, and a plain tee neckline just doesn't look right with this sweater - so I'm thinking tank or cami or a collared shirt). The only other modification was the order in which the last bits were knit - First I knit the body, then I did the button bands, then the neck edging, leaving the sleeves for last - this allowed me to use up the most yarn possible...and it just so happens the sleeves wound up a perfect length!

I don't recall how many buttonholes the original pattern called for, but since it is recommended to knit the sweater with negative ease, I wanted to be sure to prevent any sort of gapping problem and went aggressive with the buttons. After finishing the main body, I pondered installing a zipper instead of buttons, but swiftly killed that idea as I thought the rustic nature of the yarn lent itself much more to some fancy buttons.

Here's a closeup detailed shot of the armscye - isn't it lovely? I'm really glad I discovered this method for creating set-in sleeves, because I hate seaming up set-in sleeves that are knit separately from the body. I'll probably have to study the technique some more to understand the math behind it, because I can tell you the first time I picked up way too many stitches (I went with my intuition and didn't do the math) - once I realized the sleeve was turning out to be big enough for me to put my leg through, I ripped it back and did the math conversion, and it goes to show I should have just trusted Clever Gudrun.

I'll leave you with a closeup of the fantastic buttons I found - antiqued brass buttons with wee trees! Perfect for autumn!
 Pattern: 198 yards of heaven (pattern on Ravelry)
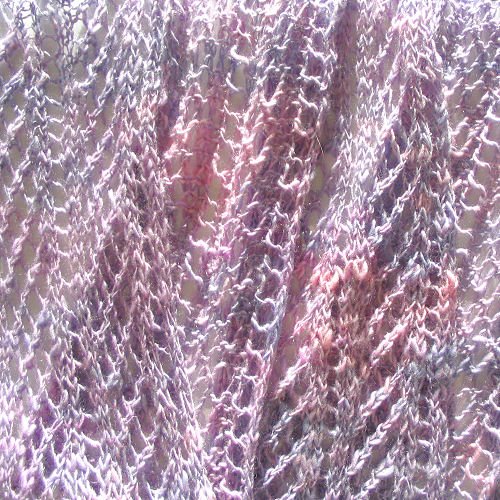
 Comments: This is a large shawlette - I totally forgot to take measurements before wrapping it up and sending it off. My cat isn't tiny, so use him for reference as you will.
 I'm really pleased with how well this came out - it's open, and plenty warm when wrapped around the neck. The colors worked out well, combining the two handspuns - and because they are both navajo plied yarns, the fabric is incredibly squooshy.
 behold :) I love the bits of green at the edge...and the slighty tweeded effects of having handblended while spinning the singles at the wheel. I love it. I hope the recipient adores it as much as I do!