Showing posts with label sweater. Show all posts

Sunday, November 15, 2009

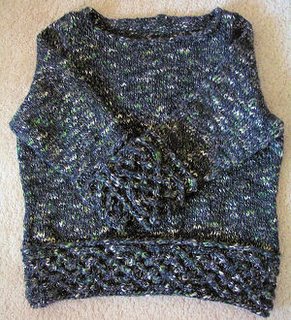
Rustic Autumn Audrey

Pattern: Audrey in Unst from the fall 2009 Twist Collective by Gudrun Johnston
Yarn: SuDan Hug-a-sheep handspun 2-ply Border Leicester (from a sheep named Libby on SuDan farm in Oregon)
Needles: Ravelry fails me - or rather I failed and didn't enter the data. I can't remember if I used US4 or US5 or US6. Regardless, there was math involved.

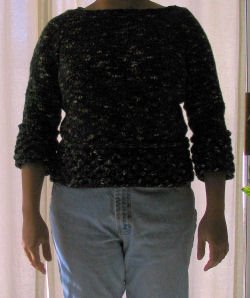
Comments: In short? I love it. This was a fast and fairly simple knit - and it was especially interesting because it's seamless. I love learning new techniques, don't you?

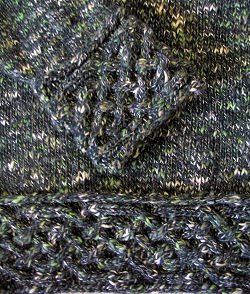
Because I seem to get stalled during the finishing, I always look for patterns that have minimal finishing required - in this case, this sweater has faux seams (along with some shaping) on the sides, and seamless set in sleeves (shaped by picking up stitches and short rowing). In addition to the faux seams and set in sleeves, Audrey has nice details including the twist stitch ribbing, the shetland lace bib motif and the I-cord edging at the neckline.

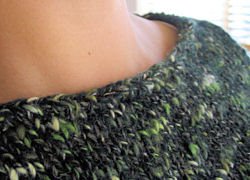
As I mentioned above, there was definitely math involved - I swatched hoping to get in the same ballpark range as the gauge specified in the pattern, but the yarn is definitely thicker in grist than the yarn called for in the pattern. As you may imagine, the major math bits were around the armscye, the lace motif and the neckline - I wound up reducing the number of lace motifs in the bib motif, while still having it occupy approximately the same space as on the original design. The neckline is a bit more boat-shaped, making it challenging to find clothes to wear under it if I want to layer (I tend to live in T-shirts, and a plain tee neckline just doesn't look right with this sweater - so I'm thinking tank or cami or a collared shirt). The only other modification was the order in which the last bits were knit - First I knit the body, then I did the button bands, then the neck edging, leaving the sleeves for last - this allowed me to use up the most yarn possible...and it just so happens the sleeves wound up a perfect length!

I don't recall how many buttonholes the original pattern called for, but since it is recommended to knit the sweater with negative ease, I wanted to be sure to prevent any sort of gapping problem and went aggressive with the buttons. After finishing the main body, I pondered installing a zipper instead of buttons, but swiftly killed that idea as I thought the rustic nature of the yarn lent itself much more to some fancy buttons.

Here's a closeup detailed shot of the armscye - isn't it lovely? I'm really glad I discovered this method for creating set-in sleeves, because I hate seaming up set-in sleeves that are knit separately from the body. I'll probably have to study the technique some more to understand the math behind it, because I can tell you the first time I picked up way too many stitches (I went with my intuition and didn't do the math) - once I realized the sleeve was turning out to be big enough for me to put my leg through, I ripped it back and did the math conversion, and it goes to show I should have just trusted Clever Gudrun.


I'll leave you with a closeup of the fantastic buttons I found - antiqued brass buttons with wee trees! Perfect for autumn!

Saturday, October 31, 2009

Flaming Featherweight

Pattern: Featherweight Cardigan by Hannah Fetig
Yarn: Jade Sapphire Lacey Lamb - exactly 2 balls.
Needles: US3
Completed in just under one month to wear in celebration at a wedding :)

Comments and Modifications - because you know there had to be some! The biggest modification was probably the substitution of yarn - lacey lamb is a true laceweight yarn - probably not quite cobweb, but definitely much finer than the Malabrigo Lace yarn that was called for in the pattern. Due to the difference in the yarn thickness, I wound up coming down several needle sizes during the swatching process - I basically knit a gauge swatch, switching needle sizes as I went along, until I found a fabric I was happy with...and then I did math to figure out sizing.

This cardigan is an entirely seamless top down raglan - as such, the construction is quite simple and straightforward, though it does involve miles and miles of flat stockinette knitting :) Once I got to the point where the sleeves would join the body, I placed the spare stitches on cords to hold them, and wound up casting on a few extra stitches at the underarm (total of 6 for each side) to make up for the difference in gauge. Knitting through to the hemline, I added some moderate waist shaping before finishing with a seed stitch boarder. Keeping in mind that I wanted my front panels and collar to match the hemline, I took note of total number of rows knit to achieve the desired front panel/collar depth. Because I knew I planned on knitting to the end of the yarn. Instead of saving the front panel/collar for last, I bound off the hem and immediately began picking up stitches and knitting up the collar in seed stitch (this also made for one less end to weave in...always a bonus ;) ) As soon as the collar and front panels were done, I knit both sleeves, simultaneously from either end of the ball - I finished with less than a yard of yarn to spare once the cuffs were bound off (also done in seed stitch).

Before blocking, the hem was somewhere around hip level on me - I did not anticipate quite the amount of stretch the fabric had once it had gotten wet, though it all worked out in the end because the sleeves were in an in-between zone somewhere between mid forearm and wrist - I aggressively blocked the sleeves longer and they are now a perfect length. If I had it to do over again, I'd consider knitting to smaller dimensions and reducing the number of raglan increases. With the fabric growing considerably during the blocking, this cardi has a bit of excess through the underarm/bust area that would definitely be improved by not completing quite as many increases - though it fit perfectly in this region before it hit the water.

You may notice that my cardigan also is a bit longer in the front - this was not intentional, and was also a result of blocking - and the difference in behavior of stockinette vs perpendicularly knitted seed stitch in laceweight. I'm actually rather pleased with how it came out. This cardigan can be dressed up or dressed down to suit, and I hope to get lots of wear out of it :)

Wednesday, September 30, 2009

OWLs

I saw a similar vest on Oiyi's daughter and quickly settled on what to knit for my friend Amy's soon to arrive baby. I had been going round and round thinking hats, baby surprise jackets, other baby sweaters, baby blanket...decision paralysis at its finest ;)


Pattern: Owl Baby Vest (download via Ravelry) OR get the instructions straight from the designer's blog
Yarn: Debbie Bliss Rialto, superwash merino (because baby things *should* be washable
Needles: US 4 & 5

Comments and Modifications: The biggest modification was the elimination of two owls (original vest has 5 across the front) and the seed stitch band that goes all the way around the vest during the course of the Owl section. I don't know why, but I really do prefer the fewer owls and the seed stitch to the purl field and stockinette on the back of the original. The only nit I have with the pattern is that the owls seem not to be perfectly centered underneath the point of the V-neck. At first I wondered if it was something I did during the course of the conversion (and this may well still be the case - that it's all knitter error on my part) - but looking at some of the other finished projects it seems like at least on some of the vests, the owls are off center.

Overall though, the knit was fast, and the instructions easy to follow - if you're looking to give cables a try, this may well be considered a good project since the more owls you eliminate the fewer cables you actually need to complete ;)

Friday, April 17, 2009

Whisper

Pattern: Whisper, from Spring 2009 Interweave Knits
Yarn: Noro Silk Garden Sock (~2.5 skeins)
Needles: US 1 1/2, 3 and 6 (2.5mm, 3.25mm and 4.0mm)

Comments: A really fast knit - I actually finished this in 2 weeks, but kept putting off the photography. Clever seamless construction, this is more a "shrug" than a true cardigan as it doesn't really close completely in front.  The front is basically a pair triangles that come together like a wrap - the cross point on me appears to be about the same as for others who have knit this - slightly below the bustline.  This will definitely do nicely as a light pullover when temps are just a little chilly.

As you may guess, I did indeed modify - the most obvious may be that I didn't use the called for lace yarn, and as a result knit to my own gauge/fabric only using the instructions as a guide for construction.  The sleeves and bottom hem feature seed stitch (I wasn't fond of the idea of the rolled hem).  Also, the sleeves are more traditional in shape - starting with the notched edge, and increasing slightly in size as the sleeve grows in length (rather than starting wider and tapering downward).  I also knitted the lower portion of the back to include some waist shaping to make the garment more closely follow natural bodylines, and I also added a bit of length to make it hit at about the same place as a regular cardi would....technically I guess I'm not quite done, since I still have sme ends to weave in!


Tuesday, June 24, 2008

EZ Seamless Saddle Shouldered Sweater

Please excuse the flashy shot - when it's not six million degrees outside and no longer raining ashes, I'll try to get a better photo!

Pattern: Elizabeth Zimmermann's Seamless Saddle Shoulder Pullover (found in several of her books, including Elizabeth Zimmermann's Knitting Workshop, and The Opinionated Knitter.
Yarn: Koigu Painter's Palette Premium Merino, colorway 326; 6 skeins
Size: 40" Bust
Needles: US 2 (2.75 mm)

Comments: The EZ in the title of this post refers to Elizabeth Zimmermann, and not how easy this sweater was to knit - but it may as well refer to that, as it truly did seem to fly off the needles with minimal notes required. Of course, I did some modifications to the recipe/pattern as usual, not completely following the instructions as written. Modifications include:
  • provisionally casting on for the sleeves so that after finishing the body and neckline, I could just knit on the sleeves until I ran out of yarn
  • V-neck
  • grafted back placket (a la the hybrid style sweater)
Knit from the bottom up*, this sweater moved along surprisingly fast given that it's almost completely knit in fine gauge stockinette. I had several learning "opportunities" along the way, including discovering that no matter what I did with a folded hem, it seemed determined to flip outwards - I finally opted to finish with a 1x1 rib at the bottom of the sweater (that I can either wear tucked up underneath the sweater, or pulled down for a longer look), and notched (to accommodate my elbows) seed stitch edges at the sleeves. In addition to the flippy hem, I discovered the way I have previously executed applied i-cord (used to finish the edge around the neckline) was not working real well (it looked sloppy for some reason) - I wound up picking up all the stitches first, then applying the i-cord edging.

I have to say I'm quite pleased with how this sweater fits, and I'm tickled at where the sleeves ended up. The curious among you may wonder just how much yarn I had left...and the answer is hardly any. More specifically, after knitting both sleeves simultaneously down from the body of the sweater and binding off, I had a mere 2-3 inches of yarn left attached to each sleeve!


*if you were reading along my main blog, you might note that I apparently rushed into splitting the top for the V neck and yoke - I wound up picking up stitches above the hem, unzipping the knitting stitch by stitch, and knitting downwards adding additional length.

Monday, September 24, 2007

Avast, at last!


Pattern: Avast from Knitty
Yarn: SWTC Karaoke in Black Sheep Colorway (50-50 wool & soysilk)
Needles: US 5 and US7 - managed to hit gauge perfectly :D
Size: Medium
Modifications: Slightly longer torso (I think) longer sleeves, and I opted to knit the sleeves in the round and kitchner the underarm seam rather than seam it. Essentially the sweater is seamless :)

Comments: I honestly don't recall if I washed the swatch before carrying on with this sweater - though it is fair to say that even if I had, I'm not sure I would have captured the increase in length of the finished object or not - after all, a full size sweater has quite a bit more material and weight to it than a tiny little 4x4 swatch. That said, the sweater fits great through the torso, though both the arms and the body are a touch on the long side...some of this may also be simply due to the ease that is allowed - when I took the measurements to knit to, I took exact measurements from the underarm to determine sleeve length and body length on the sweater - it should be obvious that the sweater does have some ease to it, and does not fit tightly into the underarm of the wearer (thank goodness) :)

The zipper (hard to see) actually goes all the way from the waist to the top of the collar - so in cooler weather, it can be zipped completely to form a mock turtleneck. I opted to take the sweater in to my local tailor to have the zipper installed - at 31.5-inches, I wasn't about to hand sew it in, and I certainly wasn't about to trust it to my sewing machine.

Classic in design, and easy to knit (oy, the miles of stockinette!) - I wound up knitting from a couple balls of yarn at a time in an attempt to reduce the broad striping that Karaoke tends to do. This is actually the first sweater I've knit for my Dear Husband, and he seems to like it well enough - we'll see once the weather cools down since he wasn't thrilled to be modeling it with the temps still over 100F down here!

Tuesday, February 28, 2006

Leaf Lace Redux

Remember my Leaf Lace Pullover for the Knitting Olympics?

You may recall I had some concerns over how the sweater would buckle not far down from the neckline...well, I took the sweater out for a debut, and the buckling (which became more pronounced) simply drove me bonkers.

So I spent several hours over the weekend attempting to figure out how to de-and reconstruct the sweater. It seemed there wasn't enough allowance for the shoulder area, resulting in the buckling - and since I'm so dreadful at Kitchner Stitch (you'd think I'd be an expert after grafting the sweater together!) I decided I'd remove the kitchner, and knit up from the bottom. Unfortunately, this meant a serious overhaul was in order. My limited understanding of set in sleeves (and my desire to not have to rip out and reshape the sleeve caps) in addition to my even more limited understanding of neckline shaping made for a frustrating evening of pattern modification.

Behold! The fruits of my labors! Excuse the color - the photos in the original leaf lace pullover post are more true. I was so pleased when I was finished I simply couldn't wait until I had proper lighting conditions!

The set in sleeves went in fairly well, though it seems perhaps I have a little bit more space than I anticipated in the bust area - the photo is a little unflattering, as it seems a little lumpy - I assure you, I'm not lumpy and neither is the sweater. I don't know what was going on...and I didn't want to wait to post until I had better photos taken. You'll notice some holes over on the right shoulder (on the left side of the photo) and in the center of the v-neck...

The holes on the shoulder were intentional...and if you look more closely, they will resolve themselves into the leaf lace pattern. The holes in the center of the v-neck were not intentional...but they seem to mirror the eyelet lace on the sleeve. The holes are an artifact of twisted stitches in the center of paired decreases. I had initially done the neckline with a regular knit stitch in the center, but later decided I didn't like how that looked and decided to redo it with a twisted stitch, resulting in those unanticipated openings.

A closeup of the neckline shows the little leaves and the center stitches of the v-neck in more detail. In case you're trying to puzzle out how I got those leaves there while knitting from the bottom of the sweater up: The answer is those are actually knit from the top down and kitchnered to the body. If you look closely, you can see a slight line where the kitchnering took place. You might also notice that my nice line of marching "V"s along side of the V-neck are slightly interrupted. This is due to the fact that knitted increases do not make the same detailing as knitted decreases (at least not the kind of increases I was using (M1 inc)). To get the marching V's back, I played around with a crochet slip stitch applied to the border. While not perfect, it's good enough for me, and can be redone if at some point I decide it needs to be better matched to the opposite side of the neckline.

Sunday, February 19, 2006

Leaf Lace Pullover

Cast on for the Yarn Harlot's Knitting Olympics, I'm pleased to say I've finished this sweater within the allotted time, with a week to spare!

Pattern: modified from the Leaf Lace Pullover in Teva Durham's Loop-d-Loop. The pattern was altered to work with a worsted weight yarn, lengthen the body and add a touch of shaping at the waist.

Yarn: Southwest Trading Company Optimum in Lilac

Needles: US8

Comments: If you have trouble with Kitchner stitch, this is not the sweater for you - both arms are grafted to the body at the shoulder, and the top and bottom of the sweater are also kitchnered together. Overall, I'm fairly pleased with the sweater, and I do like the leaf details.

The lengthening of the body obviously does result in the hem and arm leaves landing fairly close together - I suppose I could have not lengthened it quite so much, but I really dislike sweaters that land right below my waist, as it typically means I have to remember to keep my arms down or risk baring my non-sculpted middle!

While I'm not minding the placement of the leaves at the neck - through some inconsiderate math on my part, they landed nearly right in the center, rather than being offset - I am still undecided on the neckline with its mock-turtle-like lines. Over the course of time, it has a tendency to buckle a bit. I have been successful in resolving this problem by wearing the sweater with the neck unbuttoned and folded over - though that solution hides the leaf details and is asymmetric.

While the sweater is indeed finished and perfectly wearable, I'm not certain how long it will remain in this state. I may very well decide in some time to pick out the kitchner stitching, detach the arms, and re-knit the top of the sweater with a crew or scoop neck - sans leaves of course....but it's safe for now :D

Wednesday, November 30, 2005

Finito!

tis done...well, 99.9% done anyway!

And it fits - sorry about the dreadfully dark photograph - I was having issues (to say the least) and was incredibly eager to post all about it as a Finished Object.

Anyhow, the details:

Pattern: Kepler by Emily over at Fathom Harvill

Yarn: Berroco Uxbridge Tweed in Southbury Green (discontinued - hooray, a stash buster!) - incidentally, it took about 10.5 balls of yarn (more than I had anticipated)

Size: Large

Needles: US9 with finishing touches using US7

Useful Skills/Techniques: Cabling without a cable needle (highly recommended), Set in Sleeves (proceed with caution), kitchner stitch (extra tricksy on cable bands) and applied i-cord (still needs work, for me anyway!)


Comments:
The pattern was well written, and easy to follow. Instead of knitting all the pieces separately and having a small mess of seams to finish at the end, I knit a good portion of the pieces in the round....I began with the cable bands, all at the same time, Kitchnered em together (and while it was a mite tricky, they came out fantastic and nearly invisible). I proceeded to pick up the stitches for both sleeves and knit em together in the round using one long circular needle (until the sleeve cap, of course). I Started with the sleeves and knit em together to reduce the probability of getting hung on sleeve island. I did the body in the round as well, splitting at the bottom of the armscye, and the knitting flew by.

Seaming the arms to the body (using lots and lots of pins, joining the pieces with a slip stitch crochet seam) and finishing with the applied i-cord (see below for closeup, was very slow going on my part) in one evening, the sweater is complete and wearable, though it might benefit from a gentle blocking - mostly because I don't think the shaping at the waist is very defined as it is - then again, that might be my own fault for knitting it in the round and not having side seams to help give the sweater some form on the sides.

While I am fairly pleased, I would prefer to have had more defined shaping on the finished object (and it looked like it did while I was knitting it - but again, the sweater, as is, is currently unblocked) and I think I might prefer full length sleeves over the mid forearm capri-length ones - then again, that cable band is quite bulky and may well have driven me nuts if it was at my wrist. The Uxbridge Tweed appears to wear alright, though the cables aren't as clearly defined as I had hoped - I suspect this is due to the tweediness of the yarn.