Showing posts with label cardigan. Show all posts

Thursday, June 03, 2010

Emmaline Inspired

Pattern: Emmaline from Knitty.com.
Ravelled
Needles: US6 and US8
Yarn: Malabrigo Twist in Olive and Malabrigo Worsted in Cypress

Buttons: Too many (14) - well, it felt like too many in the sewing on process, but I think it looks nice.
Pattern Modification: Lots. See comments below :)

Comments: I was looking for a quick knitting project to use up some "leftover" yarn from previous projects - Emmaline seemed to be about right for yardage, and it seems like a design that would flatter various body shapes. I tend to prefer the versatility of cardigans, and this design looked easy enough to modify - so away I went.

I did start with a gauge swatch, all the better to do math to figure out approximately what size I might correspond to in the pattern for reference purposes. Once I figured that out, I also had to make notations on stitch counts - especially since I was going to be knitting this sweater flat rather than in the round. I didn't subtract any stitches in the front to accommodate for the modest button band - I just split the neckline in half and adjusted the eyelet placement to be symmetrical on either side, while allowing for a stitch to be lost when I picked up for the button band later. When I got to the purl bump section, I tried the sweater-in-progress on, and determined that I would need to lengthen that section (to approximately 3 inches below the underarm). I moved the underbust shaping to land...well, under my bust. For the size I was knitting, the original pattern centered the decreases right at the center of the sweater.

I also wound up moving the body shaping to hit under the underbust shaping, and also changed the increases to happen in the center panels rather than in the side panels. The sleeves were decreased at a much more gradual rate to minimize poof, though if I had it to do over again, I'm not entirely sure I would add the eyelets (and resulting increase in stitches) to the sleeve caps - there is a little bit of excess material at the underarm region - I'm not sure if this was due to the increases in the body, the sleevecaps or both. Body length was shortened to hit at my hip. The trim on the hem and arm bands is done in moss stitch, while the button band is 1x1 rib. To finish the whole thing off and to stabilize the neckline, I added an i-cord trim.

Total knitting time was just over a week and included time to tear back and make various modifications.

Tuesday, March 09, 2010

And now a better photo

with buttons! These are classic leather-wrapped buttons to go along with the classic design of this cardigan. Not sure how everyone else approaches it, but my button jar is rather barren - I tend to finish a project...then I drag it into the knitting store where I can "try on" buttons or finishing accents at will :)

Sunday, February 28, 2010

Cable Cross-Country

Literally!
Knit for the 2010 Winter Knitting Olympics, this cardigan was cast on during the Opening Ceremonies, and was bound off, blocked and seamed before the beginning of the Closing Ceremonies. While there were no knitting injuries this time round, there were several false starts, and some lost time due to motion sickness. Pieces of the sweater have traveled from the desert southwest clear to Florida (where I tested my tolerance of rollercoasters and motion-simulating rides, in addition to discovering what Portugese Man of War jellyfish look like when washed up on a beach) Even with the cross-country travel and the various do-overs, I found myself parked in front of the TV seaming up the cardigan during the Canada-USA Hockey game - once finished, we set the cardigan aside until an opportune moment for the finishing photo:

Sorry all the photos are so dark - looks like I'll have to try for some new photos during daylight hours to really show this sweater off.

Pattern: Cable Cardigan, from Erika Knight's Men's Knits: 20 New Classics
Yarn: Malabrigo Twist in Olive
Needles: US 10 and US10 1/2
Size: Small, with added length on sleeves.

Comments: Once I got going, this was a pleasure to knit. I opted to knit the pieces as written, with the exception of the sleeves, which I knit in the round while adding length before knitting the sleevecaps...and the collar, which I knit and attached as I went along....oh, and I grafted the collar together, instead of doing the recommended join...oh and made the 2 st cables mirror each other on each side, and opted for making 1-row buttonholes instead of how they were written...so I guess maybe I did tweak it more than just a little ;)

One major error was found in the pattern while knitting - and that was the increase row for all pieces. As written, the increase row does not account for all stitches. It was easy enough to figure out where the stitches needed to be accounted for by referencing the next few rows -but to save folks some time, where the pattern reads [k1, inc in next st] (or [inc in next st, k1]) it should really be k2 in each of those instances in stead of k1. For the back, there are also 2 additional k1's - one before the first set of increases, and the other at the end of the last set of increases. The only other item I warn you about is that the author of this book is british - so double check your needle sizes. A US 10.5 and US11 are not the same size as english 10.5 and 11 needles...it's probably best to reference the needle size in mm. I wound up using a lot less yarn than I thought I would - I don't know the reason for this, I only know that of the 10 skeins I expected to use, I only used 8.

But it still fits perfectly (again, perhaps hard to see due to the dark photo - I'll try to remedy this soon). Unlike my usual cavalier method of knitting sweaters (which involves the casting on of a sleeve and checking my gauge as I go), I actually swatched for this project...and not just swatched, but swatched, then washed, blocked and measured. Because I actually did this, I relied on math to determine total number of rows to knit to determine body and sleeve length - there were times during the course of the knitting that I was questioning this plan, but it all worked out (and it also saved me the aggravation of constantly digging out a tape measure to check progress).

Finishing was a little bit of a struggle - but mostly because I'm really rusty at seaming up projects - I tend to prefer seamless knitting when possible. The shoulders took a little bit of time because after I bound off the individual pieces, I decided a 3-needle bind off was the way to go to complete the join, so I had to pick back the bindoffs to make the appropriate stitches live again. Setting in the sleeves was actually less painful than seaming up the sides of the body - probably because I didn't keep a knitted selvedge and had moss stitch all the way out - once I started paying better attention to the columns of moss stitch, it made the seaming up go much faster. I'm very glad I devised a way to knit the collar straight onto the sweater body - partly because it reduced the final seaming, but also because it ensured that the collar was perfect length and not too long or too short - as I mentioned above, I opted to graft the 2 halves together once I got to the center of the back - it made for a much more beautiful finish, I think.


Sunday, November 15, 2009

Rustic Autumn Audrey

Pattern: Audrey in Unst from the fall 2009 Twist Collective by Gudrun Johnston
Yarn: SuDan Hug-a-sheep handspun 2-ply Border Leicester (from a sheep named Libby on SuDan farm in Oregon)
Needles: Ravelry fails me - or rather I failed and didn't enter the data. I can't remember if I used US4 or US5 or US6. Regardless, there was math involved.

Comments: In short? I love it. This was a fast and fairly simple knit - and it was especially interesting because it's seamless. I love learning new techniques, don't you?

Because I seem to get stalled during the finishing, I always look for patterns that have minimal finishing required - in this case, this sweater has faux seams (along with some shaping) on the sides, and seamless set in sleeves (shaped by picking up stitches and short rowing). In addition to the faux seams and set in sleeves, Audrey has nice details including the twist stitch ribbing, the shetland lace bib motif and the I-cord edging at the neckline.

As I mentioned above, there was definitely math involved - I swatched hoping to get in the same ballpark range as the gauge specified in the pattern, but the yarn is definitely thicker in grist than the yarn called for in the pattern. As you may imagine, the major math bits were around the armscye, the lace motif and the neckline - I wound up reducing the number of lace motifs in the bib motif, while still having it occupy approximately the same space as on the original design. The neckline is a bit more boat-shaped, making it challenging to find clothes to wear under it if I want to layer (I tend to live in T-shirts, and a plain tee neckline just doesn't look right with this sweater - so I'm thinking tank or cami or a collared shirt). The only other modification was the order in which the last bits were knit - First I knit the body, then I did the button bands, then the neck edging, leaving the sleeves for last - this allowed me to use up the most yarn possible...and it just so happens the sleeves wound up a perfect length!

I don't recall how many buttonholes the original pattern called for, but since it is recommended to knit the sweater with negative ease, I wanted to be sure to prevent any sort of gapping problem and went aggressive with the buttons. After finishing the main body, I pondered installing a zipper instead of buttons, but swiftly killed that idea as I thought the rustic nature of the yarn lent itself much more to some fancy buttons.

Here's a closeup detailed shot of the armscye - isn't it lovely? I'm really glad I discovered this method for creating set-in sleeves, because I hate seaming up set-in sleeves that are knit separately from the body. I'll probably have to study the technique some more to understand the math behind it, because I can tell you the first time I picked up way too many stitches (I went with my intuition and didn't do the math) - once I realized the sleeve was turning out to be big enough for me to put my leg through, I ripped it back and did the math conversion, and it goes to show I should have just trusted Clever Gudrun.


I'll leave you with a closeup of the fantastic buttons I found - antiqued brass buttons with wee trees! Perfect for autumn!

Saturday, October 31, 2009

Flaming Featherweight

Pattern: Featherweight Cardigan by Hannah Fetig
Yarn: Jade Sapphire Lacey Lamb - exactly 2 balls.
Needles: US3
Completed in just under one month to wear in celebration at a wedding :)

Comments and Modifications - because you know there had to be some! The biggest modification was probably the substitution of yarn - lacey lamb is a true laceweight yarn - probably not quite cobweb, but definitely much finer than the Malabrigo Lace yarn that was called for in the pattern. Due to the difference in the yarn thickness, I wound up coming down several needle sizes during the swatching process - I basically knit a gauge swatch, switching needle sizes as I went along, until I found a fabric I was happy with...and then I did math to figure out sizing.

This cardigan is an entirely seamless top down raglan - as such, the construction is quite simple and straightforward, though it does involve miles and miles of flat stockinette knitting :) Once I got to the point where the sleeves would join the body, I placed the spare stitches on cords to hold them, and wound up casting on a few extra stitches at the underarm (total of 6 for each side) to make up for the difference in gauge. Knitting through to the hemline, I added some moderate waist shaping before finishing with a seed stitch boarder. Keeping in mind that I wanted my front panels and collar to match the hemline, I took note of total number of rows knit to achieve the desired front panel/collar depth. Because I knew I planned on knitting to the end of the yarn. Instead of saving the front panel/collar for last, I bound off the hem and immediately began picking up stitches and knitting up the collar in seed stitch (this also made for one less end to weave in...always a bonus ;) ) As soon as the collar and front panels were done, I knit both sleeves, simultaneously from either end of the ball - I finished with less than a yard of yarn to spare once the cuffs were bound off (also done in seed stitch).

Before blocking, the hem was somewhere around hip level on me - I did not anticipate quite the amount of stretch the fabric had once it had gotten wet, though it all worked out in the end because the sleeves were in an in-between zone somewhere between mid forearm and wrist - I aggressively blocked the sleeves longer and they are now a perfect length. If I had it to do over again, I'd consider knitting to smaller dimensions and reducing the number of raglan increases. With the fabric growing considerably during the blocking, this cardi has a bit of excess through the underarm/bust area that would definitely be improved by not completing quite as many increases - though it fit perfectly in this region before it hit the water.

You may notice that my cardigan also is a bit longer in the front - this was not intentional, and was also a result of blocking - and the difference in behavior of stockinette vs perpendicularly knitted seed stitch in laceweight. I'm actually rather pleased with how it came out. This cardigan can be dressed up or dressed down to suit, and I hope to get lots of wear out of it :)

Friday, April 17, 2009

Whisper

Pattern: Whisper, from Spring 2009 Interweave Knits
Yarn: Noro Silk Garden Sock (~2.5 skeins)
Needles: US 1 1/2, 3 and 6 (2.5mm, 3.25mm and 4.0mm)

Comments: A really fast knit - I actually finished this in 2 weeks, but kept putting off the photography. Clever seamless construction, this is more a "shrug" than a true cardigan as it doesn't really close completely in front.  The front is basically a pair triangles that come together like a wrap - the cross point on me appears to be about the same as for others who have knit this - slightly below the bustline.  This will definitely do nicely as a light pullover when temps are just a little chilly.

As you may guess, I did indeed modify - the most obvious may be that I didn't use the called for lace yarn, and as a result knit to my own gauge/fabric only using the instructions as a guide for construction.  The sleeves and bottom hem feature seed stitch (I wasn't fond of the idea of the rolled hem).  Also, the sleeves are more traditional in shape - starting with the notched edge, and increasing slightly in size as the sleeve grows in length (rather than starting wider and tapering downward).  I also knitted the lower portion of the back to include some waist shaping to make the garment more closely follow natural bodylines, and I also added a bit of length to make it hit at about the same place as a regular cardi would....technically I guess I'm not quite done, since I still have sme ends to weave in!


Tuesday, September 30, 2008

Birthday Bog Jacket

Pattern: Bog Jacket, with modifications/add-ons - found in Knitting Around
Yarn: Southwest Trading Co Karaoke, in Durango (I think), with accents in Forest and a tan colored discontinued colorway.
Needles: US6 / 4.0 mm, gauge 4 st/ridges per inch
Size: 42"

Comments and modifications: and there are many! Lets start with the general commentary, shall we?

The Bog Jacket is a garment made essentially from a square or rectangular piece of fabric with little to no waste - for more information and instructions on constructing your own Bog Jacket, please refer to either the book above, or check out this PDF on a woven fabric Bog Jacket. Knit in Garter Stitch, this version of the Bog features the similar construction details - the Garter Stitch fabric was chosen because it lends itself easily to the math and grafting required in assembly. That said, it also lends itself to its own peculiarities. In particular, I re-discovered what I already knew...that Karaoke + Garter St + water (by way of blocking) = Ginormous Knitting - so much so that once I properly blocked the jacket, it is now probably considered tunic length (well past my hips, which is where it was pre-blocking) and the sleeves...oh my goodness. The Sleeves are crazy long. Like long enough for an orangutan - Right now, I'm calling the Bog "Done" - without any closures on it (initially I was thinking zipper, now I'm thinking frog closures, or something similar), and with the crazy long sleeves turned back about 3 times for really fat cuffs. If they bother me too much having those massive bumper-like cuffs bongling around my hands and wrists, I'll consider it Steek practice and use a crochet-reinforcement to mark the cutting point.

Now then, the modifications - I did the various modifications that were suggested by EZ with the exception of the fake seams and the pockets - these included: Short rows in the back to make a slight dropped hemline in the back of the jacket, short rows in the sleeves in an attempt to make them less kimono-like, shoulder shaping (moved out just a smidge from the recommended location, and they hit my shoulders perfectly now, even with all the extra stretch in the fabric), waist shaping (though I had to rip out the entire bottom of the jacket once I had it seamed to relocate the shaping to be much higher), and applied i-cord all the way around. Other modifications or diversions from the proscribed formula: I made the "body" portion of the bog jacket shorter than recommended - I don't recall the as-knitted length, but with the stretch that occurred during blocking, it is more than long enough! For extra sleeve length, I measured my own "wing-span" and determined and cast on the "appropriate" number of stitches to get me to that length - unfortunately I think with all the stretch that has occurred, I may well have been okay casting on very few extra stitches, though I will have to go back to my notes to double check!

Comments for possible future bog knitters - keep in mind that the knitted bog jacket should allow you some flexibility to make the garment fit you in a customized manner. Keeping in mind the extra stretchiness of garter stitch, depending on your personal circumference, you may want to make note of the following:
  • Seriously consider the growth that might happen with your yarn choice and the knitted fabric for your sleeves - you may not need to cast on many extra stitches at all to obtain proper sleeve length!
  • 50% of your circumference may well be way too much fabric for both the sleeves and body lengths - I'd recommend measuring the armscye of a t-shirt that you like to determine the appropriate number of rows to knit for the sleeves.
  • Consider knitting the bog from the top down - if you're really clever, this will allow you to basically make a shrug-like garment - you'd get the kitchenering of the sleeve(s) done earlier on, and you could determine if you've knit way too much sleeve depth or not enough. You may even be able to do the kitchnering without even doing the "thumb trick" but I'm not certain ;) since I haven't completely thought it through. Anyhow, once you have the shrug-like garment completed and the bottom all held on a huge circular needle, you can try it on, and knit your waist shaping accordingly.


Now updated with a photo of me *in* my bog jacket, and all it's stretched garter stitch glory :) Don't get me wrong, I learned a LOT in this construction, and I do like the jacket - it's just it will likely wind up being more like a house / car coat kind of thing rather than an every-day cardi like my Ribby Cardi or my Cabled Cardi.

ps. yes, I know my cardi matches my cat. I wish I could say that his posing on it was planned....but you know cats ;)

Friday, December 28, 2007

Cabled Goodness (Central Park Hoodie)


Pattern: the Central Park Hoodie, originally from Knitscene now available from Interweave's Knitting Daily shop.
Yarn: Paton's Classic Merino Wool in Burgundy - less than 6 balls used.
Size: 44 - though my gauge was slightly smaller, so it's somewhere between a 40 & 44.
Needles: US 5 & 7
Modifications? Of course!

Commentary:
I do believe this is one of the fastest sweaters I've ever knit. I don't recall ever being quite so eager to cast on for any given project - I blame this one on the cold weather snap that has me bundling up in all my handknits - definitely a rare treat down here in the desert! Anyhow, I purchased the pattern and went hunting for yarn on December 11th, knit a hasty swatch and cast on that evening. That would be where modification # 1 came in - I knit the body in one piece - after consulting the pattern, I found it odd that the fronts and the back didn't end with the same type of stitching allowing for nice seam in the ribbing, so I simply cast on the total number of stitches (I didn't subtract 4 stitches for the seams) and knit happily away on my 2x2 ribbing. After 4 inches of ribbing, that was where I discovered that there must have been an error in the pattern - The right sides of the fronts should have started out with opposite stitches - the Right Front should have started with P2 instead of K2, and vice versa for the Left Front - voila, the missing stitches and the non-smooth ribbing was now accounted for. Undeterred, I decided I could make things work out and didn't rip back the 4 inches of ribbing on small(er) needles.

In order to make things all look good, I had to decide if I was going to have the cables appear to seamlessly emerge from the ribbing on the fronts or the backs - or see if I could fudge things around to make it look excellent on all counts. I wound up settling for having the outer cables on the back not flow perfectly up and out of the ribbing, though I was able to salvage the center cables by turning them into 4x4 cables rather than 3x3...Of course, I came to this realization after I had knit several inches of the body - fear not, I didn't rip it all back to resolve this - instead I opted to drop back all the cable stitches for that center cable sequence and pick them up and reknit em from the ribbing upwards :) Sadly, I didn't take photos - it was an impressive sight. My husband thought I was nuts. Once I had the cables changed to my liking, everything from then on flowed quite nicely. I had been tempted to graft the shoulders together, though I was not satisfied with my initial (hasty) results, and wound up doing the 3-needle bindoff instead.

For the hood, I decided I wasn't going to be happy with the cable ending abruptly at the top bottom of the neck, nor was I going to be satisfied with it ending at the top of the hood to disappear into a seam - I figure a hood is just like a really big sock heel, so I went ahead and modified the pattern, changing the decreases and carrying the cable up and over the top as if it were a heel flap - I also modified the ending sequence of the cable pattern to have them merge together into a single 2x2 twisting cable at the front of the hood. While I am very happy with the results, I should probably confess to having ripped back the hood at least once as the first attempt left me with a gigantic hood that would have looked more at home on a flowing cape than on a fitted cardigan (it was way too voluminous). With a lot more patience, and my handy Vogue Knitting Ultimate Knitting Book opened to the 1x1 rib grafting instructions, I wound up grafting the edging cables together at the top center of the hood quite nicely if I do say so myself :)

Sleeve Island was conquered by knitting both sleeves together, at the same time, circularly - the same way I knit socks ;) Finally, I set in the sleeves, and picked up all the stitches for the 2x2 ribbed edging (yes, another modification, I went to all that trouble to make the hood look seamless, I couldn't very well have allowed for a seam front and center now could I?) and knit like a fiend. I finished all the knitting on Christmas Eve Eve, tried various methods of closures from simply holding the cardi closed by overlapping the front edgings and pinning them with a DPN, to installing buttons on the insides to allow for clean lines of ribbing to be featured - I wasn't happy with either option, so I gathered up some yarn scraps and braved Jo-Ann Fabrics on Christmas Eve to find a zipper - lucky me, they had a perfect match, in a perfect length...and it was 50% off :D...now all I had to do was get the darned thing installed...

Those of you who are aware of my previous cardi adventures know that I don't trust my handknits to myself and my sewing machine - I typically hire out to have my zips installed. Unfortunately, there was no way the zip was going to get installed in time for Christmas if I went that route....so the rest of Christmas Eve was spent referring to various sources on how to hand-install a zipper.

I patiently pinned the zip in (as recommended by the Domiknitrix book) and carefully tried it on to make sure there was no bunching or rippling. I then basted the front of the cardi shut to make sure all the ribbing was happily aligned (per the fantastic instructions by Bonne Marie at Chic Knits and adjusted my initial pin-job accordingly. I then threaded my needle with matching thread and whip stitched that baby in place as directed in that Vogue Ultimate Knitting book. Once the zip was secured, I turned back around and backstitched my way right back down the zipper to make sure it was in for the duration. I should note for those wondering that there were no modifications required to get the zipper to go in nicely, though you will notice a slight mashing of the yarn about a stitch or two in from the bound off edge - this is where the backstitches march on the fabric. You might want to go with a different edging, rather than the K2P2 rib, but as I didn't do so, I can't comment how well a different edging might look - I'd think a plain stockinette hemmed band would work well, though it would mean additional seaming/finishing - but I suspect it would be easier to install the zip on something other than the 2x2 rib - especially if you're slightly obsessive like I am and want all the knit parts to line up nicely with all the purl bits :)

I daresay I did a pretty good job of it, don't you?

And here we are, outside, where the light gives a much better represntation of the actual color of the cardi. With nice long sleeves, and a slightly longer body than my Ribby Cardi, I think this will become a favorite this season!

Of course, I can't leave you without a view of all the cabled goodness :D Definitely a treat to knit, and fast too - and yes, I was done before Christmas :D

Monday, September 24, 2007

Avast, at last!


Pattern: Avast from Knitty
Yarn: SWTC Karaoke in Black Sheep Colorway (50-50 wool & soysilk)
Needles: US 5 and US7 - managed to hit gauge perfectly :D
Size: Medium
Modifications: Slightly longer torso (I think) longer sleeves, and I opted to knit the sleeves in the round and kitchner the underarm seam rather than seam it. Essentially the sweater is seamless :)

Comments: I honestly don't recall if I washed the swatch before carrying on with this sweater - though it is fair to say that even if I had, I'm not sure I would have captured the increase in length of the finished object or not - after all, a full size sweater has quite a bit more material and weight to it than a tiny little 4x4 swatch. That said, the sweater fits great through the torso, though both the arms and the body are a touch on the long side...some of this may also be simply due to the ease that is allowed - when I took the measurements to knit to, I took exact measurements from the underarm to determine sleeve length and body length on the sweater - it should be obvious that the sweater does have some ease to it, and does not fit tightly into the underarm of the wearer (thank goodness) :)

The zipper (hard to see) actually goes all the way from the waist to the top of the collar - so in cooler weather, it can be zipped completely to form a mock turtleneck. I opted to take the sweater in to my local tailor to have the zipper installed - at 31.5-inches, I wasn't about to hand sew it in, and I certainly wasn't about to trust it to my sewing machine.

Classic in design, and easy to knit (oy, the miles of stockinette!) - I wound up knitting from a couple balls of yarn at a time in an attempt to reduce the broad striping that Karaoke tends to do. This is actually the first sweater I've knit for my Dear Husband, and he seems to like it well enough - we'll see once the weather cools down since he wasn't thrilled to be modeling it with the temps still over 100F down here!

Thursday, February 17, 2005

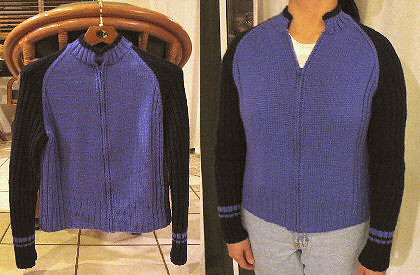
ChicKnits Ribby Cardi

Lookie, lookie! My first sweater ever!

Pattern: From ChickKnits - The Ribby Cardi

Yarn: From Elann.com - Peruvian Highland Wool in Periwinkle and Ink (I think) :D

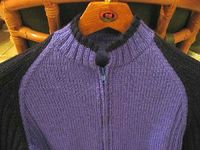
Details: Medium Size, Plain Panel Front & Back, 2" Mock neck with Zip closure.

Comments: Definitely a fun and relatively quick knit - especially when knitting the front panels and sleeves simultaneously (also helps to ensure that each piece matches it's mate!) Modifications included adding an extra inch or two to the body length and two full inches to the sleeves. Seaming was a breeze, even for me - a person who goes out of the way to design out seams when possible!

Regarding yarn usage, I purchased 8 skeins in the Body Color and 4 skeins in the contrast color (pattern called for 12 skeins total for the size I planned to knit) - I used all of the contrast color except for a yard or two, and have exactly two skeins left of the main color.

The Peruvian wool was a pleasure to knit, and it makes for quite the toasty cardigan. I thought it was a little scratchy when I first put the sweater on, but after a few minutes, I no longer noticed - definitely a pleasant surprise. Length wise, Ribby fits very nicely, hitting just above my hips with sleeves that come down about an inch past my wrist - just the way I like 'em. The sleeves are snug, but have plenty of ease due to the ribbing throughout. Because I blocked the heck out of her, she fits a bit loosely through the body- nothing that a quick dampening to relax the side ribbing won't cure! The only thing I have issues with is the slight ripple that is formed just under the collar on the back of Ribby. I assure you, that's Ribby and not me :D I'm not certain why this is, or if blocking will cure it, but I think it's due to the fact that the back panel is straight across the top and has no neck shaping*. Ah well, I'm happy to have her complete in time for some use before the summer comes :) I really enjoyed the process of creation, and am contemplating another Ribby, perhaps in a cotton or other more warm-weather friendly yarn.


*Well, so much for that theory :D Chalk it up to inexperience. Some back and forth with Bonne Marie, the designer of the most fabulous Ribby, leads me to believe that I may have not have picked up my stitches quite right across the neck. Some additional blocking may be in order to try to flatten that small ripple out.

**Regarding the stripes on the sleeves, they were very simple to add. I knit 20 rows in the sleeve color, then knit two rows in the body color, two rows in the sleeve color, four rows in the body color and voila! Back to regular sleeves we go! Don't forget to check your sleeve length to make sure the sleeve stripes land where you want them to!